The Ultimate Guide: How to Carve Your Ibérico Paleta

Ibérico Paleta deserves your utmost respect. Years grazing in the Spanish dehesa meadowlands, and at least 24 months of aging and care by some of the most venerated food artisans in the world, means that when it comes time to carve this thing of beauty, you've got to do it right.
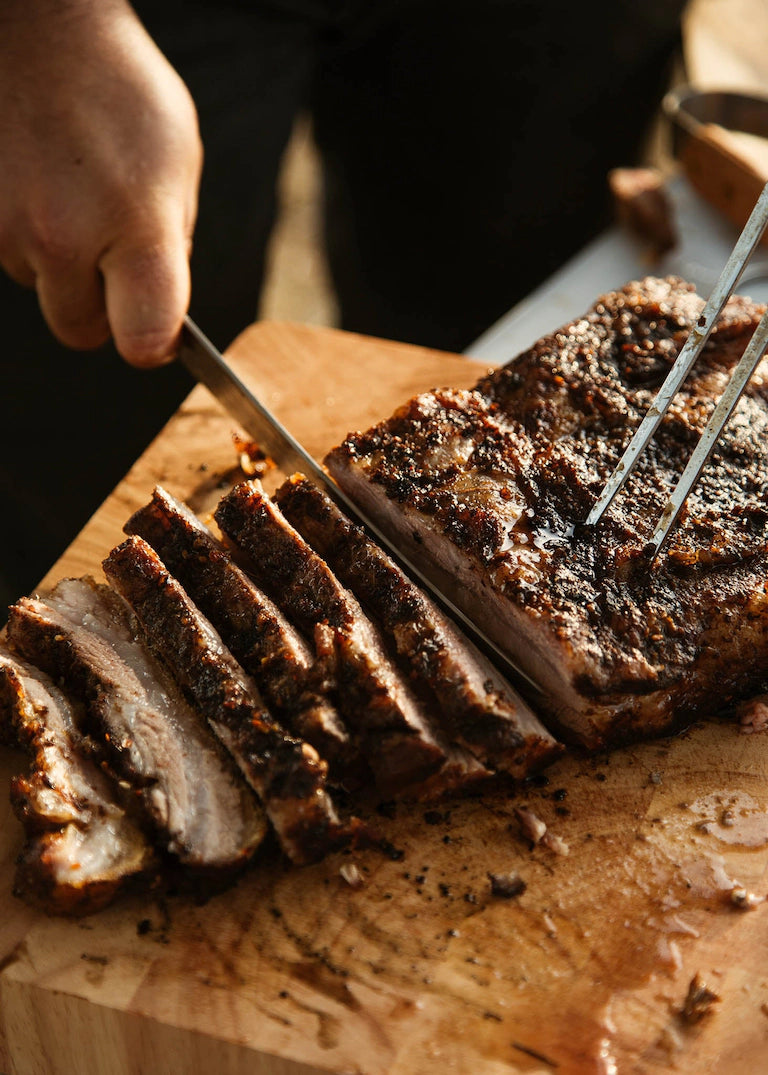
Unlike most styles of charcuterie around the world, Paleta is not machine-cut but rather delicately carved by hand. This method helps the consumer get the absolute most out of every square-inch of the Paleta. In Spain, nothing goes to waste. From the outer covering, to the thick layers of fat, to the more fibrous parts of the Paleta, each has its purpose and re-purpose.
We would be lying if we said the carving process is a simple one. It requires some knowledge and a bit of reading. Heck, there are folks in Spain, called ham masters, who dedicate their lives to the art of carving Paletas and Jamón. So we've harnessed their carving wisdom are a giving you an in-depth look at carving up a Paleta on your own. We promise it's possible. With these detailed steps and videos, you'll feel prepared and confident when that Paleta, or paletilla as it's fondly called, proudly arrives at your doorstep. Now let's get carving.
Need help assembling your jamonero Paleta holder? Watch this video:
Jamonero Assembly (with jamón) from Campo Grande on Vimeo.
*Note: In this video we carved up a Paleta weighing around 7 kg (about 15 lbs). Depending on the size of your Paleta, you will end up with a different yield, or total amount of meat from the leg.
Step 1: Prep the Paleta
- Carefully remove the Paleta from the plastic just as you would any other vacuum-sealed packaging. Keep in mind there will be juices in the bag so do your best to keep them inside the package and maintain a clean work area.
- Take hold of your Paleta by the narrow end (where the hoof would be) and pat it dry with paper towels to eliminate excess grease.
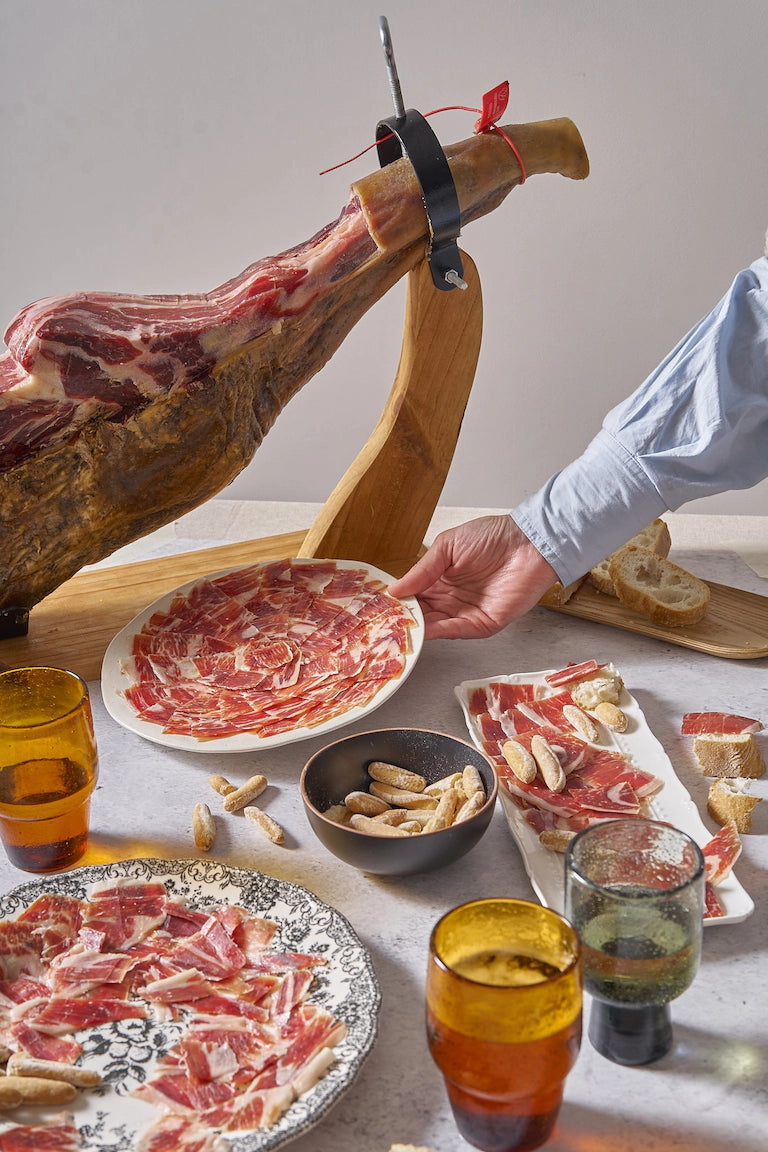
- Mount the Paleta on the "Jamonero" ham holder, with the rounder side of the Paleta facing upwards and the narrow end downwards. Secure the Paleta into the holder by screwing down onto the wrist until it is secure. Know the Parts
There are 3 main parts or sections of a Paleta. With the wrist area tilting down you can identify the:
- Contramaza: the top, rounded area
- Maza: the underside, flatter area
- Jarrete: the lower section closest to the wrist
Step 2: Grab Your Blades
You'll need a few things to properly carve the Paleta:
- Strong butcher's knife: this is ideal for cleaning and removing tougher areas.
- Boning style knife: a knife of similar length as the first, with a much more narrow blade, is also real for carving around thin bones.
- Stainless-steel carving knife: this is the most important and is specifically used for carving those luxuriously thin Jamón and Paleta slices.
PRO TIP: Keep your knives sharp! If you haven't sharpened your knives in while, now is definitely the time. A dull knife is likely to shred the Paleta rather than carve it.
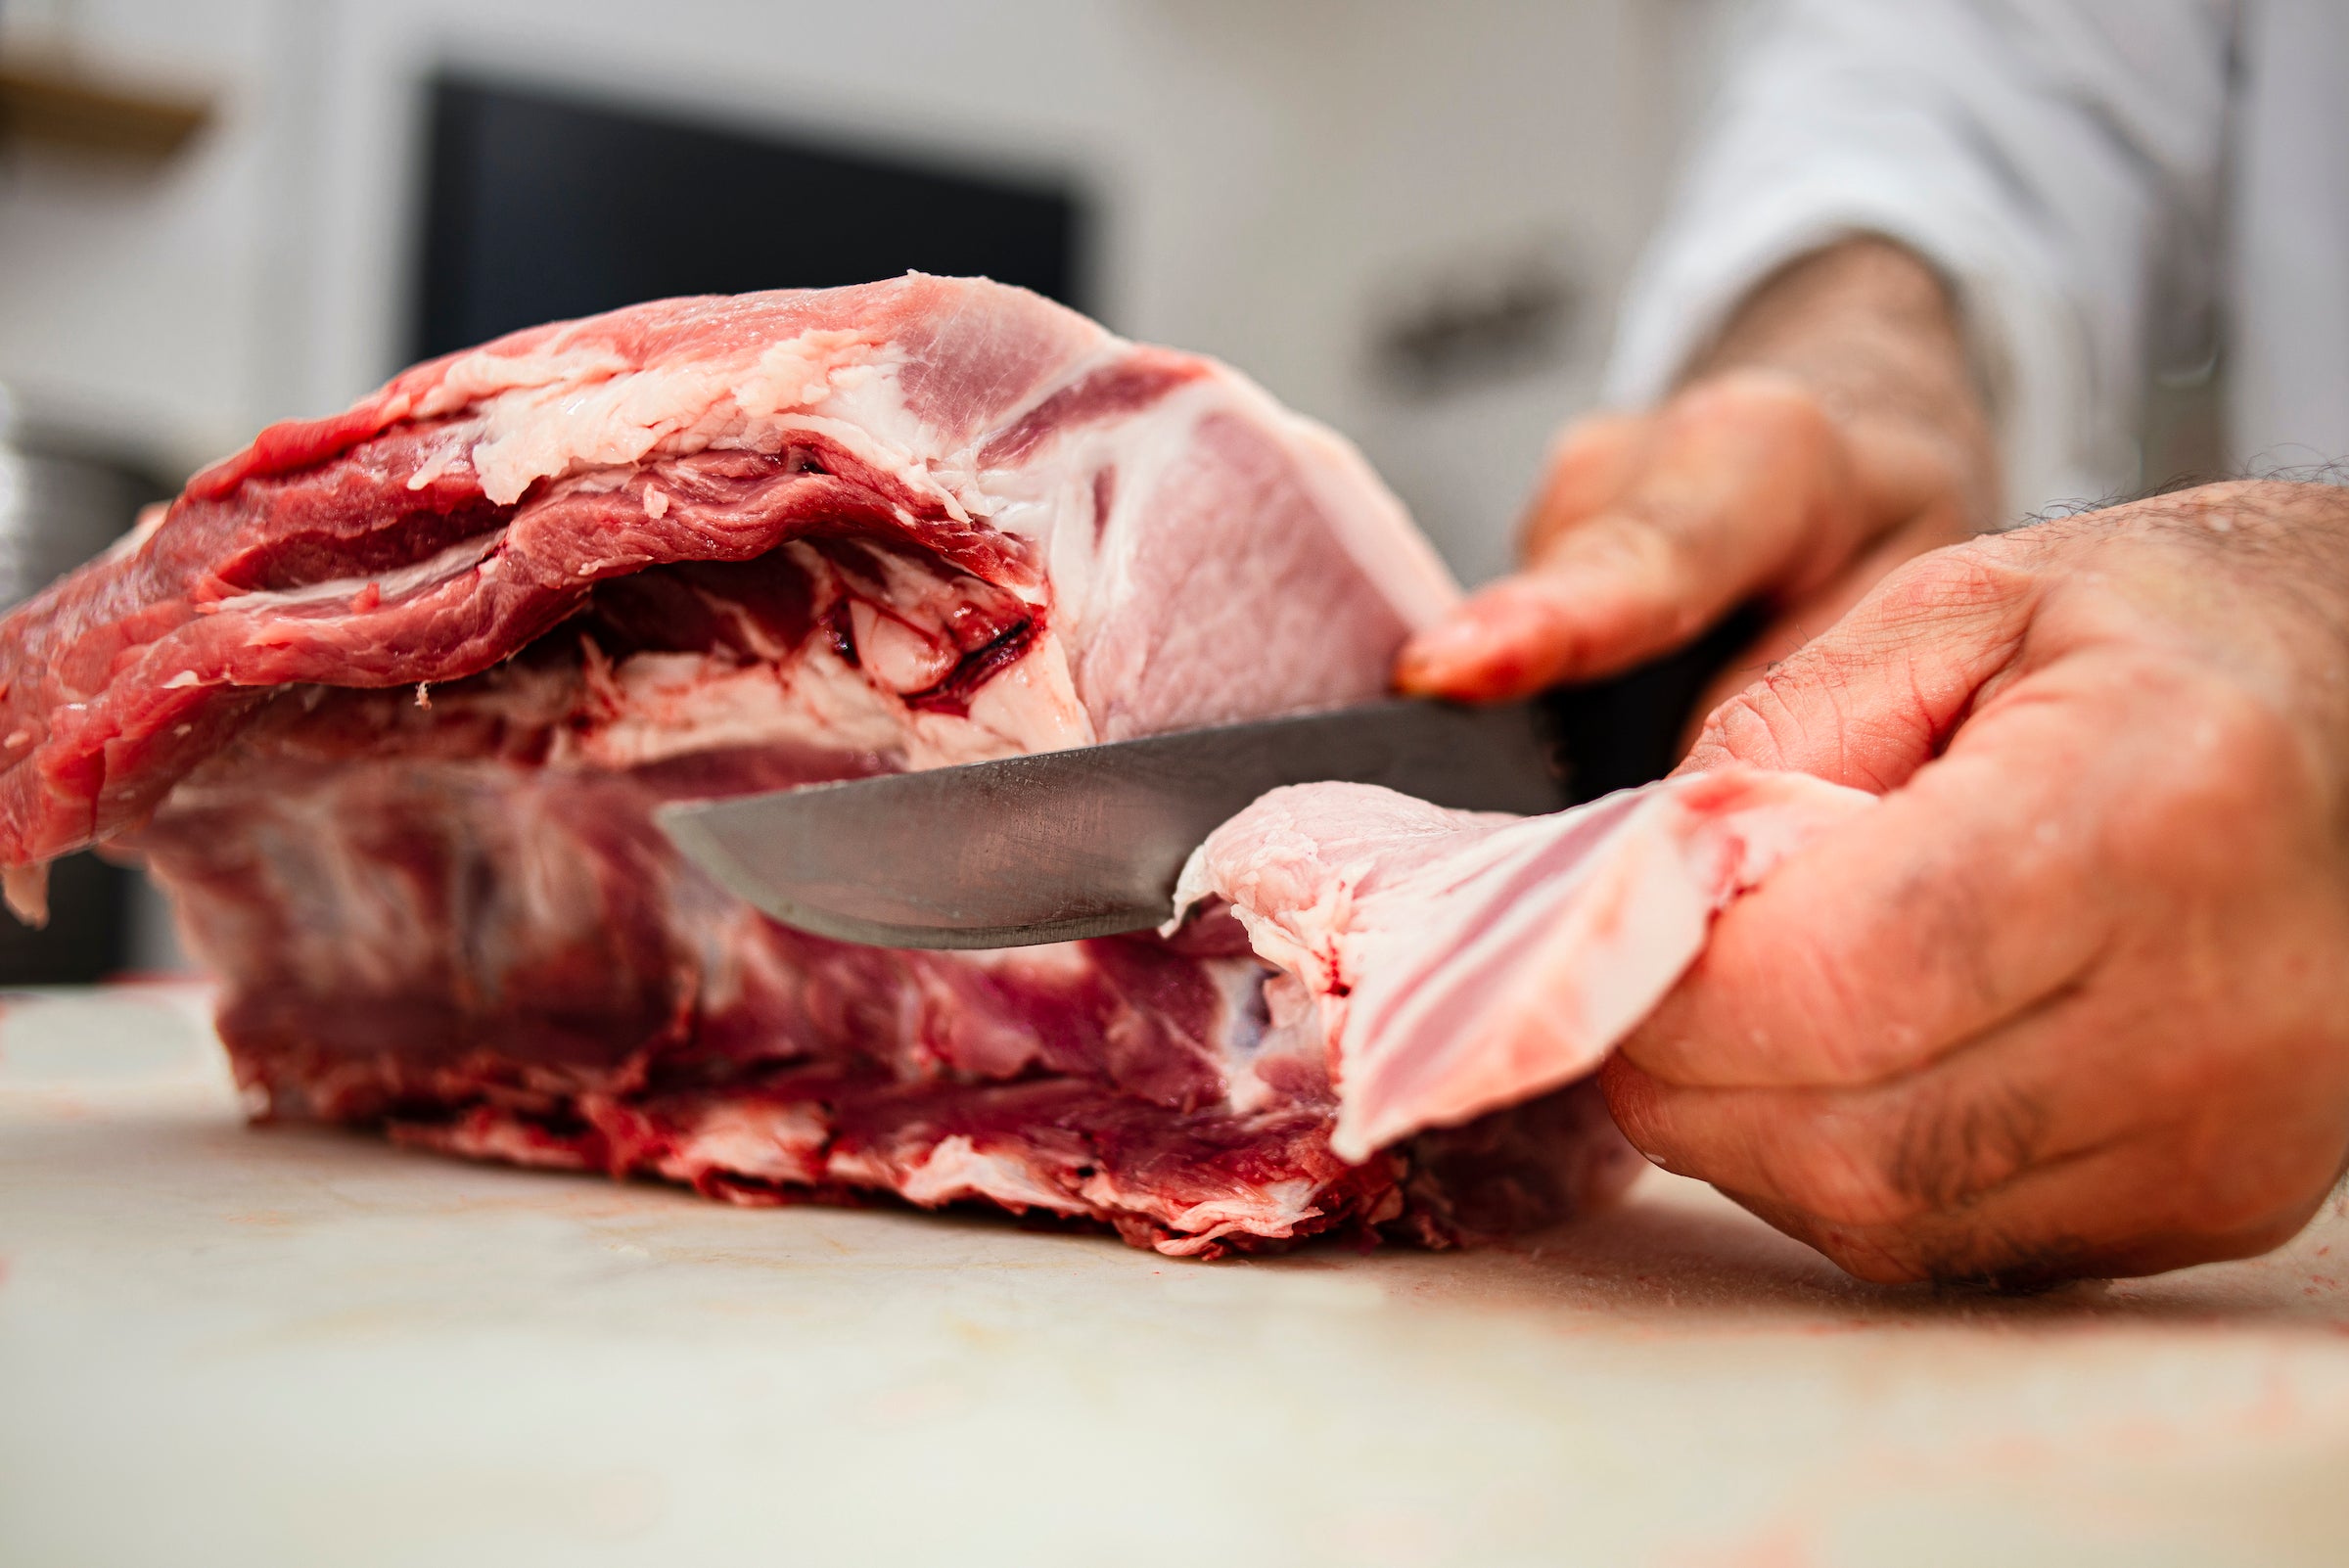
Step 3: Clean the Paleta
The first step in carving is what's called "cleaning" the Paleta. You are essentially removing the outer tough skin and protective fat to get down to the good stuff. This step will require much more force that the delicate cuts of meat.
NOTE: Before you start cutting away, keep in mind that you only want to carve the part you intend to eat over the next day or two. If you're planning on carving up the whole thing for a crowd, go ham (pun intended) and remove all the skin.
- Grab your strong butcher's knife.
- Locate the wrist bone of the Paleta, near the narrow end of the leg. Two-fingers' distance below the wrist bone, make a cross-wise incision. Start by placing the knife directly perpendicular in the middle of the wrist and working sideways to cut halfway, and then turning the knife and repeating the same on the alternate side.
- This area is tough and fibrous, so don't be scared if it takes a little elbow grease to make the incision.
-
A few inches down from the incision (right about where it starts to curve upwards) start to cut towards the incision (keep the knife as horizontal as possible), carving away a thick layer of yellowed fat, and exposing some of the meat. Discard the outer skin and yellow fat as you remove them. Handle the skin with care, it can be surprisingly sharp.
- Begin carving off pieces of the yellowed fat, cutting towards the initial incision. You will not necessarily reach the ruby red meat with every cut-- you'll encounter thick layers of glistening fat around the meat as you get closer to the top contramaza area. Simply remove them carefully as you go.
- As you continue to carve, you will have more clean fat exposure one side of the ham and more meat exposed on the other.
PRO TIP: Between cutting sessions, cover the exposed meat with a clean cloth to help keep it from drying out.
Step 4: Slice the Contramaza
Now it's time to start carving the contramaza. You will notice that the contramaza slices are slightly more fibrous than the maza.
PRO TIP: As you slice, try to keep the knife as horizontal as possible so the slices stay extra thin.
- Grab your long, thin stainless-steel carving knife.
- Start a few fingers down from the initial incision and slice towards it, using your non-cutting thumb to support the knife. Keep the knife as horizontal as possible to help cut short, paper-thin slices.
- Notice that as you get to the end of each slice, you may need to make a crosswise cut to cleanly remove the slices from the Paleta.
- As you go, place the slices decoratively on a serving plate.
- As more meat is exposed, start to cut away from the wrist along the Paleta and into the rounded area, ensuring you have an even fat and meat distribution on each slice.
- You may need to cut away additional pieces of fat. Simply cut them away and set aside.
- Eventually you will hit the rounded wrist bone. Simply carve over and around it.
- You will eventually arrive at the elbow bone farther down the Paleta. Simply cut over and around it as well, keeping your knife angle as horizontal as possible. Once you start to get closer to this bone, you will notice the slices become more and more fibrous. These more fibrous pieces are ideal for cutting into cubes, or taquitos (keep reading for secrets on taquitos).
- Eventually you will hit the shoulder blade on one side of the Paleta. At this point, start to cut laterally and in towards the shoulder blade. This is slightly more difficult! Ease the process by grabbing your the thin boning knife and make an incision along the shoulder blade to separate it from the rest of the meat. Continue to cut from the side inwards with the carving knife, using the boning knife when needed separate even further.
- Continue to carve up and around the bones, veering into the sides just a bit, and returning back to the end with those inward cuts.
- Once you hit the bone on the end of the Paleta, it's time to stop. Any remaining parts you see around the elbow bone can removed and used for taquitos.
Step 5: Slice the Maza
Flip the Paleta so the maza side facing up. Here, you repeat much of the same process. As you start to slice the maza, you will notice this part is juicer than the contramza, with more intramuscular fat.
- Make a similar incision near the wrist area as you did with the contramaza, and remove the outer layers of yellow fat. Continue removing until the entire maza and majority of the paleta is exposed. Again, keep those layers of fat and yellow skin to use later.
- Start carving the paleta by beginning at the top near the wrist. As you begin to cut away the fat, you will first hit a bone, which divides the paleta into sections. From that bone upwards towards the wrist, is one section. And from the bone downwards marks another area for carving. Treat them separately as you slice, keeping your knife as horizontal as possible.
- In the top wrist area, carve about an inch's worth deep of thin slices. The remaining area is a bit more fibrous and be removed later set aside for taquitos.
- Now you can begin carving the area below the shoulder bone. Carve between the bone and the curve of the Paleta. Your cuts will eventually turn to about a 45º angle here, so follow the angle of the meat.
- Now begin carving along the bottom curve. Some of the areas along the sides of the curve will be fibrous. Remove those areas into long thin strips for taquitos. You may need to use your short knife to cut in those areas, as they can be firmer.
- You will eventually arrive at another bone area--a rounded bone in the middle. Simply cut around the rounded bone area as you carve.
- Then you will arrive again at the shoulder blade on the side. Just as you did with contramaza shoulder blade, grab your shorter knife and carve around the blade. You will also need to cut larger cartilage pieces out of that area at the very bottom tip of the Paleta. About two inches up from the bottom make an incision, working from that area down around the bottom tip, sliding along the bone.
- Use the carving knife to clean additional fat from the side, leaving a thin layer. Then horizontally cut slices towards the shoulder blade working from the side inward. These slices will be longer and skinnier than others.
- Once you cut about an inch down into the Paleta in this area, it's time to start the 3rd section.
Step 6: The 3rd Cut
- Turn the Paleta on its side in the ham holder to expose the remaining layer of meat and fat (the concave blade should be facing down)
- Locate the bone a few inches up from the bottom of the Paleta. With your short knife or a boning knife, cut upwards along the bone underneath the meat.
- Now taking your carving knife, remove pieces of remaining fat, exposing the meat near the bone, and carve pieces down towards the bone. Your pieces will start short and will elongate. Stop when you notice that the tendon in running through the middle of the slices becomes thicker.
- Now start to carve above that bone near the elbow bone, removing those additional fat layers to expose the meat. Carve small slices around the bone areas, doing your best to incorporate a balanced amount of fat and meat with each piece.
- Return to the bottom area of the Paleta and use your short knife to carve around the remaining bone and remove a large piece of meat. Do the same around the other areas of the Paleta, removing large pieces until the whole Paleta is nothing more than bone with a thin layer of meat around it. You will remove several large pieces from the Paleta.
Step 7: Make Taquitos
As we said, don't let those large pieces of meat you just removed go to waste. Using your short knife or a good chef's knife, cut the large pieces into a very small dice. Many of these meaty chunks come from areas closer to the bone bone and are phenomenal additions to soups, croquettes, pasta, and vegetables.
Revel in Your Work

Observing your many plates of Paleta, you'll notice how the slices vary drastically based on their location. Textures and colors differ, shape and even flavor. We recommend trying out a piece from each of the sections. Take note the nuances and characteristic of each area of your Paleta and revel in your work. ¡Buen provecho!